
Mastering Lens Flare in Photography: Types, Effects, and Techniques
Lens flare is an interesting effect found in photography. It happens when hot light gets into the optics of a camera and, as it scatters internally, produces visual artifacts like streaks, orbs or hazy effects in your photos.
Some photographers intentionally include this flare as part of their artistry while avoiding it is the goal for others who seek a crisp quality shot. Whether you want to precisely master lens flare for dramatic pics or avoid it completely for clean-looking sharp photos, this complete guide will get you everything you need.
What Is Lens Flare?
Lens flare is created when a bright light source, like the sun, hits your camera lens at certain angles. Light does not pass directly through the lens to form an image but instead reflects off of internal components, which can create undesired reflections or artifacts.
This causes streaks of light, circular spots (ghosts), or a veil-like haze that lowers the comparison and sharpness of the image. A lens flare can ruin an entire photograph by making radiant colors wash out, or by creating a hazy softness. But if applied deliberately, it can impart a moody or retro vibe to photos.
Knowing when and why lens flare happens is an important part of deciding whether you want to use it or avoid it in your photography.
Types of Lens Flare
Types of Lens Flare: There are three main types of lens flare , and they all have different characteristics based on how the light interacts with your lens.
Veiling Flare
Veiling flare is a diffuse light that lowers contrast across the image. It occurs when light not coming in from the frame gets into the lens and scatters through the lens elements. A veiling flare is not displayed as sharp shapes or patterns but rather as a translucent/misting layer over the image.
How It Affects Your Photos:
Very little contrast at the ends of the image only.
Delicate haze , which creates the effect of “veiling” the title.
Bright areas of the frame bleed into dark ones, losing detail in the process.
Examples:
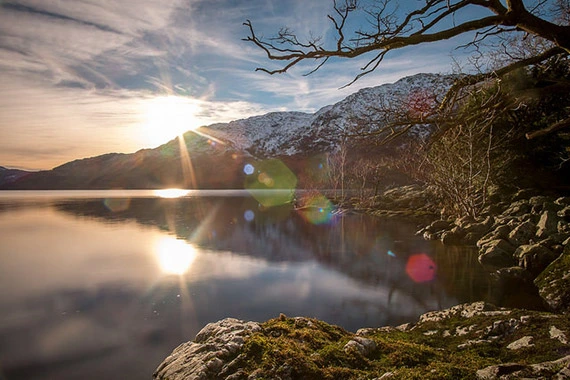
Now, imagine that you took that landscape shot, but you had the sun just outside of the frame at the top of your photo. In a veiling flare, this would appear as a bright, foggy covering that would blur details in trees or hills.
How to Manage It:
How to fix veiling flare can be to keep your lenses clean, use high-quality coated lenses, or block the stray light with a lens hood.
Ghosting Flare
Ghosting flare creates visible shapes and is often geometric or orb-like [and] shows in front of an image.” These visible artifacts are a result of internal light reflections between individual lens elements and the diaphragm.
How It Affects Your Photos:
Jittery spots, hexagons, or rainbow-hued artifacts are scattered throughout the image.
Usually displays lots of noise in images with uneven lighting.
Big impact when zoom lenses or small apertures are used for shooting.
Examples:
A night scene, for instance, with street lamps in the field of view, can produce colored circular vessels through your image.
How to Manage It:
A better lens with fewer elements or tilting your angle of shot can prevent ghosting flare dramatically.
Red Dot or Sensor Flare
The fifth type is monster This kind of flare (Also called red dot flare) happens due to bright light projected onto the camera sensor, and it reflects again into the glass lens and hits the sensor again. This is particularly the case for mirrorless cameras with short flange distances.
How It Affects Your Photos:
They are typically small and adjacent to a bright light source.
The effect is even more pronounced with poor lenses.
Examples:
If you’re shooting a bright night concert with an older mirrorless camera, you might notice faint red dots ruining your images.
How to Manage It:
Use modern, high-quality optics with the latest anti-reflective coatings to cure the possibility of red dot flare.
How do these different elements affect lens flare?
Lens flare varies with a number of different factors. Keep shooting while keeping these in mind, and you will be able to control it better.
Lens Quality
Plastic lenses are also more susceptible to flushing and will flare more. Try to get lenses that have an anti-reflective coating; this will really improve your shots if at all possible.
Focal Length
As a result of spreading the light more evenly across the focal plane, wider focal lengths tend to show less flare. Flare intensity tends to scale with increasing focal length and bright source magnification.
Lens Elements
Because complex lens designs (zoom lenses, etc.) have higher chances of reflections and ghosting flare than simpler prime lenses.
Cleanliness
Any smudges , dirt, or fingerprints will diffuse the light more, leading to more lens flare. NOTE: Wipe lenses with a microfiber cloth before shooting.
Filters
With inexpensive filters, additional reflective surfaces can be introduced, making a flare worse. Select filters with an anti-reflection design and, of course, high quality.
Lens Hoods
The lens hoods cut the unnecessary rays of light hitting the lens, which minimizes a great deal of the flare.
Shooting Angle
Light position relative to your camera is a huge influence on flare. In that position, shooting directly into the light always brings a flare.
Photography – Creating Lens Flare
On occasion, you might want to create a bit of drama and artistry in your photographs, and one of the best ways to do so is through the use of intentional lens flare. This is how to do it well.
Shoot Into the Light
Angle your camera towards the sun or another bright light source. Use sunrise or sunset for softer effects.
Block Light Partially
Simply place your subject (a tree, a person or a prop) directly in front of the source of light. That produces partial flares that emit a duller light.
Experiment with Aperture
A smaller aperture setting (e.g., f/16 or higher) will yield sharp, defined flare effects, while a wider aperture (e.g., f/2.8) will create softer blooms.
Switch Lenses
Different lenses respond differently to light. Older or specialty lenses can also help produce an unusual flare pattern.
Use Reflective Surfaces
Flares are generally more pronounced when shooting around glass buildings, large water bodies, or metallic surfaces.
Example Use Case
Light dappled through tree branches can create whimsical streaks of light dancing across your frame.
Tactics to Avoid Lens Flare
If flare is a distraction, here are different ways to dial it down or out during your shoot.
Use a Lens Hood
That’s where a lens hood can protect you from flare. Select a petal-shaped hood that covers wide-angle lenses or a round hood for longer lenses.
Switch to Prime Lenses
Prime lenses have fewer optical elements, so they are less heavy on ghosting or reflections.
Adjust Camera Angles
Move your camera to place the bright light outside the frame, or it can be behind your subject.
Shade the Lens Manually
Pair your hand, cap or a strip of cardboard to shield bokeh light rays that enter the lens.
Minimize Filters
Steer clear of stacking cheap filters that reflect light needlessly.
How to Get Rid of Lens Flare in Images
Now, lens flare might still sneak into your photos, even with careful precautions. Here are some post-processing methods that can help.
Healing or Clone Tools
In Photoshop or Lightroom, you need to remove those flare spots מלמעלה. These tools work well for small flares.
HDR Blending
Combine several exposures to remove overexposed areas made by flare.
Saturation Control
Tweak saturation, brightness, and/or contrast in the offending parts to lessen flare artifacts.
Remember that heavy editing could change the authenticity of your image. A few light touch-ups are often more natural.
Tips to Avoid Lens Flare
Lens flare is always easier to prevent than it is to edit out. Here are some failproof rules to evade unwelcome flares.
Final Thoughts
Applies to both parts of lens flare in photography. That can be a creative tool for adding warmth, nostalgia or drama to your work. However, if left unchecked, it can also degrade image quality. By understanding the different types of lens flare and what causes it, you can choose to use it to your benefit or get rid of it when you want that clean shot.
Try some of the techniques outlined in this guide to improve your control over lighting. Continue to practice your techniques, and before long, lens flare will not only not be a roadblock but something you will add as an effective element to your artwork.